
2024-11-12T11:01:43
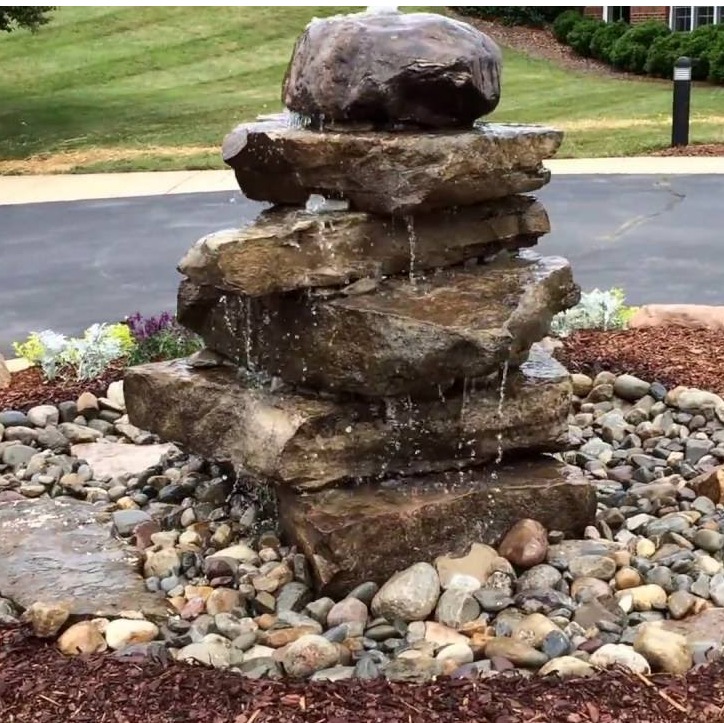
Creating a Tranquil Oasis: Water Features with Rocks and Pebbles There\'s something inherently calming about the sound of water flowing over rocks and pebbles. It evokes the peaceful ambiance of a natural stream, turning your outdoor space into a soothing sanctuary. If you’re considering adding a water feature to your garden, patio, or backyard, a water fountain or feature with rocks and pebbles may be exactly what you need. Not only does it create a serene atmosphere, but it also adds visual interest and a sense of natural beauty. In this blog, we’ll explore how you can create a stunning water feature with rocks and pebbles, where water flows over the rocks and into a basin at the bottom. Why Choose Rocks and Pebbles for Your Water Feature? Rocks and pebbles are natural materials that blend seamlessly into most outdoor environments, from lush gardens to minimalist, modern patios. Here are a few reasons why they work so well in water features: 1. Natural Aesthetic: Rocks and pebbles have a timeless, earthy appeal. They bring a sense of nature’s simplicity and beauty into your outdoor space, whether it’s a small urban garden or a sprawling backyard. 2. Sound and Movement: The flow of water over rocks creates soothing sounds that can help mask background noise, such as traffic or neighbors’ conversations. The gentle bubbling or trickling water promotes relaxation, offering a moment of peace in an otherwise hectic world. 3. Customizable Look: Rocks and pebbles come in a wide range of sizes, colors, and textures, allowing you to customize the appearance of your water feature. Whether you prefer smooth, polished stones or rough, jagged rocks, you can create a look that complements your existing landscaping. 4. Low Maintenance: Once your water feature is properly installed, rocks and pebbles require very little maintenance beyond occasional cleaning. The water’s flow helps to keep the stones clean, and adding an appropriate water treatment can prevent algae growth. Designing Your Water Feature with Rocks and Pebbles 1. Plan the Layout Before you dive into installation, take some time to plan where you want to place the water feature. Consider the overall layout of your garden or outdoor area. Do you want the feature to be a focal point, or do you prefer it to be more subtle, nestled into a corner? Also, think about how the water feature will interact with your plants, flowers, and trees. It’s always a good idea to choose a location that allows for easy access to the electrical source if you\'re using a pump. 2. Choosing Your Rocks and Pebbles The type of rocks and pebbles you use will play a significant role in the look and function of your water feature. Larger, flat rocks work well for creating the "mountain" or "cascade" effect, while smaller pebbles can be used for the basin to help the water flow smoothly into the catch area. Common types of rocks for water features include: - River Rocks: Rounded, smooth stones that mimic the look of natural streams. - Flagstone: Large, flat stones perfect for creating multiple levels or waterfalls. - Lava Rocks: Lightweight, porous rocks with a unique texture that looks great in modern, minimalist designs. - Granite or Slate: Heavier stones that provide a more rustic, rugged look. - Pebbles: Smaller, decorative stones for lining the basin or creating the effect of water "flowing" over the surface. 3. Adding the Pump and Plumbing A critical element of any water feature is the pump, which will circulate the water from the basin up through the rocks, creating that soothing waterfall effect. Make sure you choose a pump with the right capacity for the size of your feature. It should be powerful enough to pump the water up and over the rocks without being too noisy or overwhelming. If you\'re adding a waterfall, you’ll need a pump strong enough to handle the height of the water flow. 4. Creating the Flow Effect Once the pump is in place, you can arrange your rocks to guide the water as it flows over them. The goal is to create a natural, cascading flow that looks effortless and serene. Use larger rocks to create a "drop" or waterfall effect and smaller pebbles to help direct the water as it travels to the basin below. You can also create a series of steps or levels to add depth and dimension to the feature. 5. The Basin The basin at the bottom of your feature serves to catch the water as it flows over the rocks. You can choose a decorative basin, a large pot, or even a hidden reservoir that sits out of sight. Be sure to select a basin that is large enough to hold the amount of water your pump will push, and remember that it should allow for easy access for cleaning and maintaining the pump.
Have a question? Ask here!
Required fields are marked *